DrDepth Nomad user guide
DrDepth Nomad has all the functionality DrDepth MVP has. For help on all common features (settings, display of externally generated maps, waypoints, data sharing), please see the MVP help.
Basics
Nomad works similarly to the DrDepthPC application when using live data:
- The map is generated for a target area - you decide where!
(Just like the 'Internal map' in DrDepth PC). - You can use new data together with all you old data to improve you map with every use.
Typical use:
- Connect to your data source from the settings page.
- Control mapping and data loading from the map page (see below).
The settings page
The main difference on the settings page compared to MVP is the Map - main layer field:

- Mode: If set to MVP, the app is identical to MVP and the main layer is used to display pre generated .dmm maps. If set to Nomad, live mapping features are enabled, and the main layer is used to display the live map.
- Connect (in Nomad mode): Connect to a live data source.
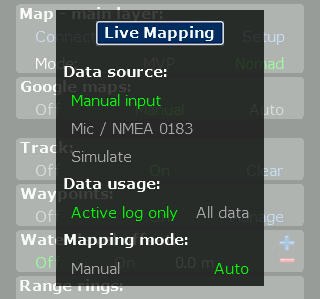
- Setup (in Nomad mode): Opens the menu for live mapping settings:

- Data source
- Manual input: Depth data can be entered manually using a depth input bar that will be displayed on the map page. This mode is useful for example when ice fishing.
- Mic / NMEA 0183: Depth data is received from a sounder via NMEA 0183. Requirements:
- The baud rate must be 4800.
- The sounder must supply DBT or DPT depth sentences.
- Simulate: Simulated depth data will be generated. This mode is for testing/practicing purposes, for example if you want to try things in the backyard.
- Data usage
- Active log only: Maps will be generated from the data available in the active log only.
- All data: Maps will be generated from all data files available on the device.
- Data source
- Mapping mode
- Manual: Mapping/data loading and map location is controlled by the user.
- Auto: Mapping/data loading and map location is automatic (driven by your GPS position). The mapped area will move with you as you go.
Note: when there is no source connected, all data will be used for mapping even if 'Active log only' is selected above.
Data files
All data is automatically stored to files with a .dnd file name extension. You can copy these files to your PC and also upload new files exported from DrDepth PC. It is a very good idea to keep a backup copy of all toy .dnd files! How to access your files:
Android:
DrDepth MVP will automatically create a folder named 'drdepth' on the SD card on your Android unit (this folder is used to store .dmm map files). Another folder named nomaddata is created in the drdepth folder - this is where all your Nomad .dnd files are stored.
Note: on some Android units the internal flash memory is reported as 'sdcard' to the system - on those units the 'drdepth/nomaddata' folder will be placed there.
iOS (iPhone/iPad):
Connect the unit to your PC/Mac and start iTunes. In iTunes:
- Select your device in the left pane.
- Click 'Apps' (or 'Program' depending on the language) in the upper menu in the right pane.
- Go down to 'File sharing'.
- Now you can copy and upload new .dnd data files.
(Note: no subfolder is used for .dnd on iOS.)
Live mapping and the map page
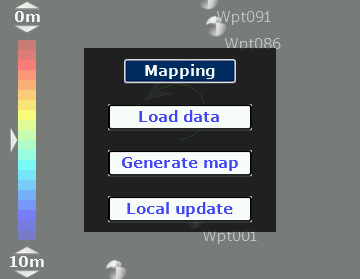
Functionality for loading data and generating maps are access from the map page. If you point and hold somewhere on the map page (but not on a waypoint!), a dynamic menu will appear with the functions currently available. Typically it will look like this:

- Load data: Load all available data (from file) in the area local to the clicked position.
- Generate map: Load all available data (from file) in the area local to the clicked position and then generate a map from it.
- Local update: Turn on map updating in the neighborhood of the current position.
If you have a map on display and/or loaded data, you will also get buttons for switching between map view and data view.
Note: The point you click/hold when opening the mapping menu is important! It determines the location that will be mapped.
Deleting bad data points
If you:
- Have data on display,
- Are zoomed in fairly close,
- Pointed close to/on a data point...
The manual input bar
When the data source is set to 'Manual', and the source is connected, a depth bar is displayed at the bottom of the display. It allows the user to enter depth data without access to NMEA data.

- Point and hold on the desired depth to enter a new point. The position will be the current position so you will need to be at the right location!
- To adjust the range displayed in the manual enter bar, simply adjust the display range of the depth color bar on the left side.

