DrDepth MVP user guide
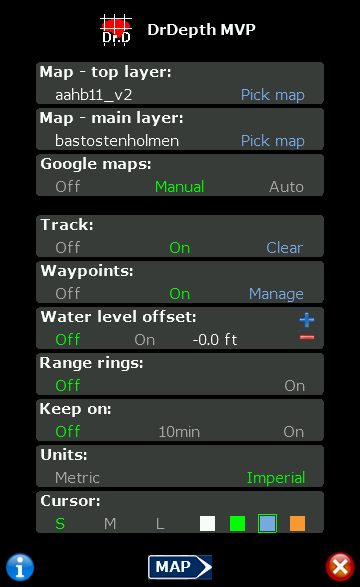
The settings page

- Pick map: Takes you to the map selection page that lists all available maps. Tap the item you want to display.
- Google maps: Manual = a new map is loaded by manually clicking the Google button on the map page. Auto = maps will be downloaded as needed (this option will generate more internet traffic).
- Waypoints - Manage: opens popup that allow you to update the waypoint file (if modified externally), and download shared waypoints.
- Water level offset: If the water level is higher than normal use a positive value.
- Keep on: stop the device from dimming the display and go to sleep.
- Cursor: Select the size and color for the position cursor.
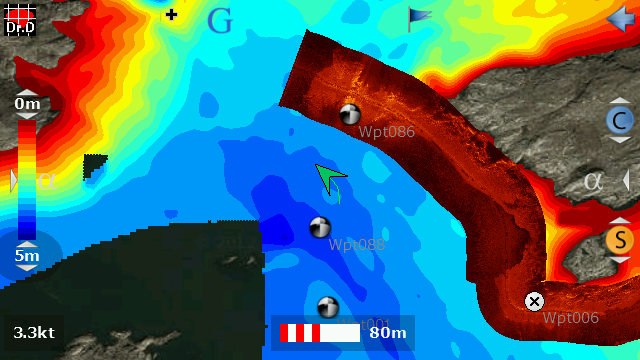
The map page

Icons at the top
- DrDepth icon: Takes you to the settings page.
- G: Load/update Google map.
- Flag: Set waypoint. (1) Point and hold icon. (2) Drag down. (3) A cross hair will be displayed to help you aim. (4) Release when done.
- Left arrow/Back: Sets your current position to the center of the screen.
- Home: Takes you to the home coordinate stored in the dmm/dmc map.
Adjusting display ranges and transparency
- Range (depth or hardness map) or Contrast/Sensitivity (sidescan map): Place you finger on the value to adjust and pull up or down.
- Transparency: Place you finger in the middle of the control bar (between the arrow and alpha) and pull up or down.
- Restore: To restore the default range from the map and remove transparency, tap the center of the control bar.
Zooming
- One finger: Place you finger on the scale and drag left to zoom out, right to zoom in.
- Two finger: Pinch the map.
Loading maps to your unit
Maps for MVP are stored in file formats with a .dmm or .dmc file extension.
Android:
DrDepth MVP will automatically create a folder named 'drdepth' on the SD card on your Android unit.
- Place your .dmm or .dmc map files in this folder.
Note: on some Android units the internal flash memory is reported as 'sdcard' to the system - on those units the 'drdepth' folder will be placed there.
iOS (iPhone/iPad):
Connect the unit to your PC/Mac and start iTunes. In iTunes:
- Select your device in the left pane.
- Click 'Apps' (or 'Program' depending on the language) in the upper menu in the right pane.
- Go down to 'File sharing'.
- Select DrDepth MVP and 'Add' the .dmm or .dmc files.
Handling waypoints
- To edit a waypoint, point and hold it on the map page - a popup will be displayed with options.
- All waypoints are stored in a file named 'mvpwpt.dwp' which is located in the same folder as the maps. The waypoint file can be edited externally. If you do modifications, use Waypoints->Manage->Reload from the settings page to read the new file. You can use the DrDepth PC application to manage your waypoints for MVP. The 'mvpwpt.dwp' file can be imported and exported/generated directly from the waypoint manager.
Sharing maps and waypoints
Data can be shared between devices and users by uploading data to an intermediate server. Contents can then be accessed by other users/devices:
- Upload waypoint: Point and hold a waypoint you would like to share (on the map page), select Share/Upload from the popup.
- Download waypoint: From the settings page, go to Waypoints->Manage->Download.
- Upload map: From the settings page, go to Waypoints->Pick map. Point and hold the map you would like to upload.
- Download map: From the settings page, go to Waypoints->Pick map->Download.
All uploads are given a key number that is used to download the data from a different device.
Note: Storage on the server is temporary. Contents will be deleted after 24h.

